Painting a feature wall in your home uses the same basic techniques employed for painting any wall. However, it’s worth taking into account a few little extra considerations, just to ensure you get a top quality finish. Feature walls are used to add an extra dimension, or a bit more impact to a room’s colour scheme. As a result, there is a tendency to use accent colours, which are often bolder, darker or even brighter than the paint colour applied to the other walls in the room. The problem with bold, accent colours is that they can often be tricky to apply!
The following guide should help you address any such issues, as well as provide you with plenty more tips on achieving the best finish when painting a feature wall.
Painting tools and materials
The most popular tools for the job are rollers and paintbrushes. Without using good quality brushes, rollers and paint, you won’t get a good quality finish. Therefore, if you’re in any doubt about what to buy, there is plenty of information on this in my Decorating Buying Guides.
Also there’s absolutely no need to use any ‘special’ paint as you’ll find some manufacturers supply what they generally term as ‘Feature Wall Paint’. As far as I can tell, it’s an emulsion paint that has no difference in composition to any other emulsion paint designed for painting walls. However, the fact that the term ‘Feature Wall’ is on the front of the can seems to make the manufacturers add a few extra pounds onto the price!
So you can use ‘Feature Wall Paint’ if you wish, but you’ll literally be paying that little extra for absolutely nothing different.
Painting technique
Painting technique for a feature wall often needs a little tweaking if you’ve gone down the bold or accent colour route. The problem with such colours is that they can sometimes enhance more general painting problems:-
1) Paint flashing
Flashing is a term used to describe the different shades or sheens of colour you sometimes see on a wall after painting. Incredibly annoying when it occurs, flashing is generally caused by one of two factors.
Firstly, paint will often dry to a different colour on areas that you have filled during the preparation process. This can happen with any paint, but it’s normally much more pronounced with bolder colours. The solution is to ensure that you prime these areas with some of your feature wall paint (slightly diluted), before applying full coats to the wall. If it has been necessary to do a lot of filling, I then tend to actually prime the whole wall with a primer sealer. My primer of choice for this job is Zinsser 123, which pretty much guarantees me that I won’t get any such flashing issues.
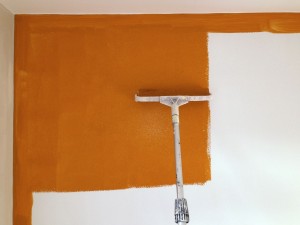
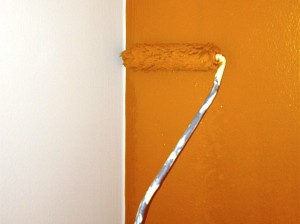
Secondly, you can get flashing where you paint onto the edge of an already dried area of the same paint. This most commonly occurs at the join between the main rolled area of wall, and the edges of a wall where you’ve used a paint brush to ‘cut in’. Again, with lighter colours, you often don’t get this problem, but with darker colours, the issue can be very pronounced! It is therefore important to maintain a ‘wet edge’ (not letting one area dry out before joining with the other), allowing you to effectively blend this join.
2) Number of coats
Normally, two coats of emulsion when re-decorating, is sufficient. On new plaster, one slightly thinned base coat (mist coat) followed by two full coats, is all that is required. However, with accent colours, you may get away with two coats, often three, sometimes four, and maybe even five for perfection!
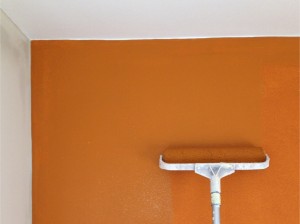
With the feature wall shown here, I actually had to use five coats. Don’t ask me the exact scientific reason why such problems occur with dark colours, but it just does. You’ll also find that oranges and reds tend to be the biggest offenders.
Some feature wall tips
Good preparation is essential, as remember this wall will be the focal point in the room and any imperfections will be very obvious.
In an average sized room, you’ll generally need 2.5 litres of paint for the feature wall. This could seem excessive, but trust me, if you want the best finish, you do normally need those extra coats.
If you’re struggling to keep a ‘wet edge’, there’s nothing stopping two of you doing the job, one cutting in, and one rolling.
All rollers produce some degree of texture in the paint finish, and at the edge of the wall there will always be some sort of join between brush and roller strokes. Good tools and technique generally make the join unnoticeable. But, with some bolder colours, the way that both natural and artificial light ‘catches’ even the slightest imperfection, can be more pronounced, often leading to a ‘framed’ effect to the wall.
If you find you’re having this problem, try using a mini roller to ‘lay off’ gently over the cut in areas to blend the join more efficiently. The size of the mini roller, allows you to get just that little bit closer to the corner junction, than is the case with a large roller, and can help provide a completely seamless finish.
Final thoughts
Most of the points I’ve described here can be applied to your painting technique as a whole, and are not just limited to feature wall painting.
If paint isn’t your ‘thing’, do check out my guide on how to wallpaper a feature wall, in order to get the best effect.
For some inspiration on choosing colours and schemes, UKTV provide some good further reading on feature walls.