How to wallpaper a chimney breast
How to wallpaper a chimney breast is no different in technique from any other wall except you just need to consider where the best starting point may be, which is often dictated by the size of pattern on your chosen wallpaper. For large-patterned wallpapers it is important to make sure the most prominent part of the design or motif is centralized on the chimney breast to provide the most balanced effect. If you are wallpapering the whole room, then you need to consider the best starting point in the room as a whole, and so please check out my guide ‘Where to start wallpapering’ for a few more pointers. Below are two examples of what I consider to be the most important factors when deciding how to wallpaper a chimney breast.
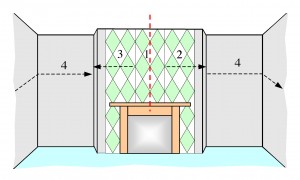
 Option 1 – Centralizing the first wallpaper length actually on the central vertical guideline of the chimney breast. |
Once you have measured the central point on the chimney breast (denoted by the red dotted line), you can then centre the first length.
|
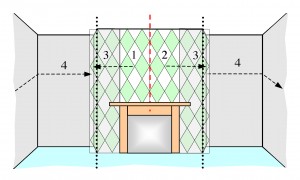
 Option 2 – Centralizing the design by hanging the first and second lengths either side of the vertical central guideline. |
It can often make more sense to hang your first two lengths either side of the vertical guideline.
|
Wallpapering a chimney breast options
- Which option you choose will depend on the exact design of your wallpaper, and possibly how wide the chimney breast is in relation to your wallpaper width.
- In Option 1, the lengths you need to hang either side of length 2 and 3 only have a small amount of wall space before bending around the external corners. The smaller the distance to the corner, the trickier it is to hang the length, so unless your design of paper makes this situation absolutely necessary, then you may prefer Option 2.
- With Option 2, you have a wider expanse of wallpaper before the external corner, making it an easier length to hang than in Option 1.
- Whichever option you choose, you must always be governed by centralizing the pattern in the most eye-pleasing way, and to complicate matters, some wallpaper manufacturers will slightly offset a central motif on the wallpaper, so you need to adjust your vertical starting line accordingly.
- Also note that it is vital to centralize a design horizontally. In both the examples shown, the diamond motifs are positioned so that the top and bottom points align with the ceiling junction, mantel piece and floor. In reality – you’ll be lucky to get as good a position as this, so you need to shift paper up and down to find the best point at which each junction ‘cuts’ through the paper.
- Therefore before you get any paste out, always have a ‘dry’ length to pin up or hold in position, whilst you decide on the best place to position the first length of wallpaper.
- For general guidance on hanging lengths and especially, dealing with internal and external corners, please take a look at my guide ‘Wallpapering a room’.
- There are indeed a few points to consider here, but don’t panic, as when you actually get round to wallpapering the chimney breast, it’s not really any different from papering any other wall, and it’s also very satisfying when you get it spot-on!

if you’ve got a picture rail on your chimney breast, would you use patterned above & below, or just below?
Totally up to you really, as it is a matter for personal taste – both options can look very effective. However, most people (myself included) tend to paint the area above the picture rail the same colour as the ceiling. If you do decide to paper above the rail, make sure that the pattern aligns correctly with the pattern below – which can be trickier than it sounds!
Good luck!
Hi, i’m just about to take my practical in L2 P&D City & Guilds Diploma, your lay out of proposed wallpaper application is great and if you don’t mind i wish to use it in my post plan report etc.
Your guidelines have given me some great input and i will continue to read your blogs, thank you, i’m a really “has to be perfect” type guy and these days its rare to find someone who actually loves what he does, and that my friend is the only place where you’ll find perfection.
Hi Chris,
Glad you like the layout, and feel free to use the information (I imagine you have to credit articles in your bibliography anyway). Hope all goes well with your Diploma.
Best of luck.
Julian
Thank you for your tips on wallpapering a chimney breast your diagrames are going to be very useful and have helped me to make up my mind to paper the chimney breast as I am not happy with it just painted.
It’s a pleasure Linda, glad I could help.
Best,
Julian
Hi Julian,
Your site is fantastic!
I want to make the Chimney breast in my bedroom a feature wall. Should I paper the side of the breast as well as the face?
I want the alcoves to remain plain.
Thanks
Julie
Hi Julie,
Thanks for your kind words, and sorry for delay in replying.
Yes, I’d definitely paper each side of the breast as well – much more effective!
Best
Julian
Hi Julian
One of the pages regarding papering on your site covers the subject of centralising a pattern,..this caught my eye because you are the first person I have seen on the net who offers the option of bisecting a pattern and starting slightly off centre…not a subject for the fainthearted!!..Given the amount of papers out there that have a non symmetrical pattern where the predominant part of the pattern off centre (be they straight or drop match) …I wonder if you have a formula for working out where the start line goes?…I normally measure across the most predominant part of the pattern, find the centre and measure from the centre to the edge of the paper to calculate the start line, but this is not an exact science and I have had to make adjustments on a few occasions…(not knowing quite why I have had to make them, but the position of the predominant part of the pattern has a bearing…
Any thoughts?
Best wishes
Steve
Hi Steve,
Great comment and question!
I think you sum up the issues with off centre predominant patterns very well. To be honest, it sounds like you have a very practical, and good technique.
It may well be possible to work out an exact formula, but in practical terms it’s probably best to do a fairly accurate measurement, and finalise positioning of your first length once it’s on the wall – which I think is basically what you do.
My technique is, with the first length of a non-symmetrical pattern design on a chimney breast, I’d draw a light vertical pencil line in a position where I felt the edge of the paper should be. I’d then position the first length (not trimming at top or bottom yet), stand back and judge ‘by eye’, as well as measure from a central point on the main part of the pattern to the corners of the chimney breast, to check how the centralisation looks side to side, and also top to bottom.
You can then adjust position slightly if you think the paper needs shifting slightly in any direction. Just make sure you have a spirit level handy to check the edge of the paper is still precisely vertical.
I’m also of the opinion that although a spirit level is essential for making sure your wallpaper is vertical, I’d also emphasise that I do trust my judgement ‘by eye’ when making tricky decisions about what actually constitutes the main part of a pattern – and where it should be positioned.
I think we’re both essentially following the same technique!
Good luck with any future tricky patterns.
Best,
Julian
Excellent, clear instructions and diagram. Thank you so much!