Garden fence essentials
If you’re thinking about putting up a new garden fence, and maybe you’ve seen one you like down at your local garden centre or DIY superstore, just bear in mind that your budget does need to include a number of bits and pieces other than just the panels and posts. You will need a good selection of tools from your ‘household toolkit’, but in this guide I want to point out a few fencing essentials that you’re probably not going to find in your toolbox. Some of the extra kit you need will be dependent on whether you’re erecting your fence on soft ground or alternatively on a concrete base, but I’ll start off with a selection of items I’d recommend you need for both.
Post levels
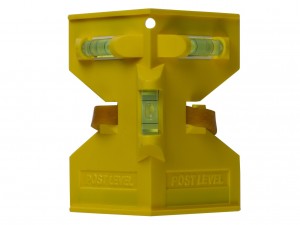 Yes you can just use a standard spirit level but a post level makes life a whole lot easier. Apart from needing at least two people to erect a fence, those two people will always wish they each had two pairs of hands.
Basically a post level provides an extra pair of hands as you simply use a rubber band to secure the level on the post, as shown in the photo to the right. The three vials allow you to easily adjust the post position to check it is vertical from all angles, and of course you don’t need to be holding the level in place whilst moving the post.
Post levels normally cost around £5, and trust me, you’ll find it to be a good investment.
Extra wood
For wooden garden fences, I’d always recommend using gravel boards, which will cost you around £2 per metre. These are nothing more than lengths of approximately 15cm x 2cm (6in by 1in) treated timber that you cut to fit along the base of your fence posts before fitting the panels in place, just above them. If you don’t use gravel boards, then the bases of the fence panels, being near to the ground, tend to get damp and therefore encourage rot. If you use gravel boards, they take up a sacrificial role as when they begin to rot, you simply replace them – a much cheaper option than replacing full panels.
Also make sure you have a few offcuts of timber around that will be useful for propping up posts when required, and remember to buy post caps (basic ones are about £1 a piece), which as well as being decorative, also help to stop water getting in the end grain of the top of your posts.
Fixings and clips
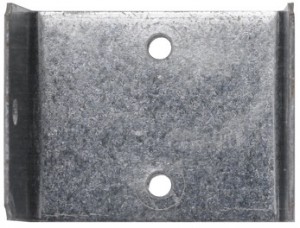 The best way to fix fence panels to posts is with panel clips. The clips shown to the right are the most commonly used, and you simply screw or nail them to your posts (normally three or four on each side of the post for a 2m fence).
You then slot your fence panels into the clips, and again fix through the clips into the fence panels.
If you buy an ‘all-in’ fence kit, they may be included, if not, it’s well worth spending the extra few pounds on these handy little clips. A pack of twenty five should be less than £10.
Erecting a garden on soft ground or concrete
![]() Your next additional costs will be dependent on whether your garden fence is being erected on soft ground or concrete. If you’re putting up your fence on concrete, rather than trying to dig a hole in the concrete to accommodate the posts, the best method of fixing them in place is to use bolt-down post brackets. These are simply secured to the ground, and the post is inserted and fixed to the bracket with further bolts or fixings. These brackets are £5-£10 a piece, and you’ll need to allow another couple of pounds per bracket for fixings, but believe me, it’s a far easier option than trying to dig holes in the concrete.
Your next additional costs will be dependent on whether your garden fence is being erected on soft ground or concrete. If you’re putting up your fence on concrete, rather than trying to dig a hole in the concrete to accommodate the posts, the best method of fixing them in place is to use bolt-down post brackets. These are simply secured to the ground, and the post is inserted and fixed to the bracket with further bolts or fixings. These brackets are £5-£10 a piece, and you’ll need to allow another couple of pounds per bracket for fixings, but believe me, it’s a far easier option than trying to dig holes in the concrete.
If you’re erecting the fence on soft ground, then you either need to dig a hole for each post and set each post in concrete or drive post spikes (£5-£10 each) into the ground, which have sockets on top to hold the ends of the posts (see right). There are pros and cons for each system.
The digging hole method is generally harder work, but you can be much more accurate when it comes to lining up the posts. The technique is also made much easier by using a product called post-mix (about £5 a bag) which is basically a small sack of ready mixed concrete, ideally sized for a single post. When you’ve got your post upright in its hole and in position, you pour in the post-mix dry, check position again, then simply use a watering can to activate the post-mix, which then dries rock hard in a matter of hours.
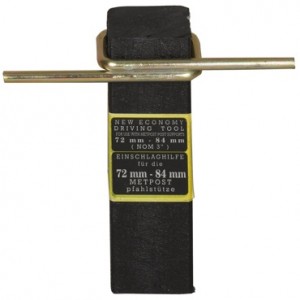 With the post spike technique, you really need a driving tool (see left), which will cost you another fiver, and sledgehammer (around £20) to knock the spikes in, which in soft ground is very straightforward, but with rocky ground, very tricky as the stones and rocks tend to knock the spike out of alignment, making it very difficult to get back in position. The driving tool also acts as an adjuster as by pulling on the ‘handles’ you can try to get the socket of the post spike back in alignment, when required.
Also remember that with all techniques, you need to be certain of where any underground services may be, but this is especially the case with the post spike, as you’re effectively driving a huge metal spearhead down a pretty long way.
Final thoughts
All the items detailed above can be seen in action in my guides, ‘Erecting a fence on soft ground’, and ‘Erecting a fence on concrete’. But, in returning to the point I’m making in my introduction about additional costs, bear in mind that whichever technique you choose, remember to account for all these little ‘extras’ in your budget, as the cost of a fence is never just the fence panels and posts.
