Buying a paint roller
Doing a paint roller review has been on my “must do” list for a while now, and having walked around my local big DIY outlet at the weekend, I thought yes, I really, really must do a guide to buying a paint roller. Seldom have I seen, in my opinion, so much poor quality product stacked on row after row of shelving, and seldom have I imagined, so vividly, the problems that people will have when they try and paint their houses with this stuff.
Now I don’t want to turn this into an angry rant, so below I’ve tried to remain objective in outlining what I consider to be the best options for a paint roller.
Roller size
By design, rollers are made to paint large areas quickly and evenly, so for me, the optimal size is a 12 inch roller. Therefore why 9 inch is the most available size, I just don’t know. Don’t get me wrong, 9 inch works fine, but do manufacturers think that people can’t take the extra weight of 12 inch, or does the extra 3 inches become unwieldy or awkward? No, and no in my view. All I find is that a smaller roller is slower.
Roller frames
There are only really 2 designs of frame . The one armed ones and the double armed ones. The one armed ones, and I’m talking about the cheapo ones here, create problems because the arm is so flimsy, when you apply pressure on the wall when applying the paint, you get uneven coverage. Also, this slight difference in pressure from one edge of the roller to the other greatly increases the risk of producing roller trails, and if you’re using a 9 inch roller, the risk is even greater as it takes that many more passes of the roller to paint the surface in question.
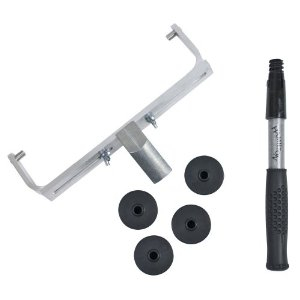
Now, the pros who prefer one armed options don’t have this issue because they will have a more expensive rigid frame, and some prefer the design as it means they can roll closer to edges. This leads me onto the double armed frames. Basically, because the roller is held securely and in the same way at each end, it is much easier to apply even pressure, in fact it very difficult not to, and therefore you get a much more even coverage, and less likelihood of roller trails  - So 12 inch, and the double arm frame designs are my preference, and shown below is an excellent option.
 |
This is the Hamilton 9 Inch To 15 Inch Adjustable Double Arm Roller Frame Kit |
Roller type and pile
You really need to take notice of what material the roller is made of, and what length the pile is. I’ve painted thousands of walls and ceilings, and I would guess that 99% have been painted with a medium pile roller sleeve. The long pile sleeve, as you may imagine, creates a more textured finish and can be useful for rough rendered surfaces on exterior work for example. However, even on exterior work, I would mainly use a medium pile, as it generally copes fine, and for really rough pebble dash render, even the longest pile roller doesn’t work, so you have to use a paint brush anyway.
Okay, so why not short pile for interior walls? Well, I always find that even the best plastered surfaces will have slight undulation, and because there is no “bounce” or flexibility in the pile of short pile sleeves, it becomes very easy to get roller trails or tram lines in the finish. Yes, you will get slightly less texture in the finished paint surface using a short pile sleeve, but there is still texture, and only marginally better than medium pile, so I’ve just always loved the versatility and ease of use with medium pile sleeves. Also, and not wishing to harp back to a rant – if you buy the really cheap fabric, foam, textured nasty sleeves that are piled high (please excuse the pun) in some stores, you do risk getting a painted finish like the surface of the moon (in my opinion!).
I think the best sleeves are made out of pure sheepskin, not just because they give a great finish, but they also last for years and I mean years – not to mention they wash out much more quickly and easily than any synthetic option.
To find a decent 12 inch roller sleeve, you’ll often need to go to your local decorator’s merchant, because for some reason unknown to me, 9 inch rollers seem to control the ‘DIY shed’ market. Keep an eye on Amazon though, as sometimes you will find a supplier with good deals on 12 inch roller sleeves.
Extension poles
Extension poles are not just for ceilings – they are for everything. It means you don’t have to bend over when loading the roller or bend over and reach when painting walls. In fact when I first started writing books, I reinforced this point as at that time you didn’t see many on sale, other than in the trade outlets. In my recent trip to a big DIY shop, the good thing was you couldn’t move for them and so the idea is now standard, the bad news was that I didn’t think that many of them would outlast the trip home, let alone using them to paint.
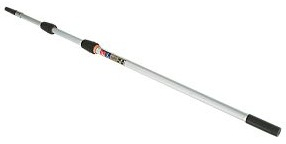
The best extension pole I ever had was a wooden pole with a threaded end to attach to the roller – lasted for at least 10 years – no moving parts – simple and almost unbreakable. Yes, the newer adjustable ones are great for obvious reasons, but the tightening mechanism on the cheaper ones just breaks or loosens too easily. Also, always go for threaded roller frames to attach to threaded extension poles. With the push fit options, however well intended the design is, I just can’t get on with them. I’ve always found that the frame just falls off, or when you try to remove it, it takes so much force that you end up throwing it across the room in the action of pulling it off (much like I did in the shop the other day, just missing an innocent bystander).
 |
This Harris pole is available at Screwfix and it does take threaded and push fit roller frames. |
Trays or scuttles
I’ve always used a tray, because I find it easiest for loading and distributing paint on the roller. The scuttles, which are basically more of a glorified bucket design, are often preferred by the pros because they can take more paint, and make it an ideal receptacle for thinning paint accurately. Personally, and in DIY terms, I think the scuttle design lends itself to dipping the whole roller in the paint which should always be avoided and therefore requires a much more refined technique for success. Â Therefore, I always recommend trays.
Metal roller trays are available on Amazon and would always be my choice, as they’re strong, last forever, and easy to scrub clean with a scourer. I bought a plastic one the other day for a change, and at the time I was trying to remember why I hadn’t used many plastic ones in the past? My memory was suddenly jogged when 2 days later I dropped it, and it cracked……
Final thoughts
This review is mainly concerned with painting the wide open areas of walls and ceilings with water-based (emulsion) paints. All those mini rollers you now see, I will talk about in a later post. On a final note, if you do go shopping for rollers in the big stores, you will sometimes be able to find what I’ve suggested, but you’ll have to sift through all the other stuff first. The cheap roller sets do have a use from time to time – applying an oil based sealer for example as you really don’t want to try cleaning out oil-based paint from a roller. In such cases, you just have to throw the roller head away. But for water-based paint, if you buy quality roller sleeves (and wash them out) they will last for years – they may look expensive at the time, but trust me, they are the most cost effective option in the long run.

I second your rant, very accurate. The people who need the most help get offered the worst pile of … at DIY stores
Hi Andy,
Thanks for visiting, and I’m glad that you share my frustrations!
Best,
Julian
Great tips! Dont forget the other essential purchase when rolling paint – Masking Tape! Perfect for protecting skirtings (tape some paper to the top to prevent it getting flecked), window frames, door frames, plug sockets and switches…
Thanks
So much good advice here which I totally agree with! Yes, medium pile is usually the best option, yes 12″ (or more) are much faster than 9″ – maybe surprisingly so to some people. I prefer Wooster 14″ sleeves on a one-armed frame. A bit harder to get even pressure compared to double-armed frames, but fine with practice – and you can get within half an inch of the edge of the wall/ceiling. I agree that cheap extension poles are an accident waiting to happen. The best mid-price ones are the screw-threaded ones, but at the higher end the Wooster Sherlock poles are brilliant – they have a durable (but replaceable) metal quick release tip which makes it much quicker to remove the roller frame – which sometimes you have to do frequently in smaller rooms when the pole gets in the way. As with most things – you definitely get what you pay for!