Planning a kitchen
Planning a kitchen really does need to be an operation of almost military precision because there are so many things to think about, and therefore so many things that can go wrong. However, the result of good kitchen planning is right up near the top of what I would call the ‘Home Improvement Project Gratification List’.

Plan everything – not just the units. Consider paint colours, flooring, tiles, and lighting, and the list goes on…..
Start planning at a very basic, functional level. Think about what you need in your new kitchen, beginning with the four main functions of most kitchens which are the preparation, cooking and serving of food, and the washing up afterwards – everything else is added on to this starting point. Try to follow the principle of the ‘work triangle’: position the sink, cooker and fridge to form the corners of a triangle 1.5m to 2.4m apart. Whatever the shape of the new kitchen, placing the appliances in this way will give you an efficient workspace.
Once you get past the functional items, remember that when planning a new kitchen you need to keep thinking about the final look. So you’ve got to tie in everything from paint colours to window blinds, to floorcoverings and lighting. All these components are vital to the finished product.
Kitchens on a budget
- Always remember that buying the actual new kitchen, appliances, and sundries is only part of the expense. You need to consider both the materials and any trade help you require for all the plumbing, electrical work, plastering, decorating, flooring etc. New kitchens need to be planned on a budget.

Consider whether you can reuse existing appliances in order to save some money.
- Changing over a kitchen for another with a similar layout is the cheapest option. Structural changes are expensive.
- Plumbing is simpler and less expensive if water-dependent appliances such as dishwashers and washing machines are close together.
- Rather than have base units (floor units) and wall units, you could opt for open shelving instead of wall units – much cheaper and also provides a greater feeling of space.
- You may be able to reuse your old appliances in your new kitchen. A new cooker may be tempting, but do you really need it?
- Instead of tiling above worktops, consider upstands which will be much cheaper and simpler to fit. This can make a considerable saving on your overall kitchen budget.
- You’ll find other things to think about in my ‘Kitchen Makeover’ guide.
Space saving kitchen ideas
- Space saving kitchen ideas really revolve around both clever, and practical kitchen planning.
- Just because you have a large kitchen area, doesn’t mean you must cram it with units. Yes, you will have more options than a smaller room, but good planning is still essential to make best use of the space.
- Small spaces are a challenge. Is it possible to move anything? Could laundry appliances fit in the garage, or a larder go elsewhere?
- If space is tight, you could, for example, choose narrow appliances as most of the major manufacturers produce slim-line machines.
- If your ceiling is high, think about using the space by extending units all the way to the ceiling and storing infrequently used items at the top.
- Ensure that you can move comfortably around the new kitchen and appliance doors are easy to open and close – leave at least 1.2m between opposing units in a narrow kitchen. Leave a similar space around a table and chairs if you have a dining area.
Planning a kitchen layout
- Planning a kitchen layout begins with drawing a scale plan of your kitchen. Make an accurate floor plan, which should include power points, pipes, windows and doors. Measure dimensions exactly and include all alcoves, room height, height of window sills, positions of windows and doors, unmovable shelves, waste, plugs/sockets and all radiators.
- Once you have a plan you can experiment with different unit sizes, and how they will fit into your new kitchen design.

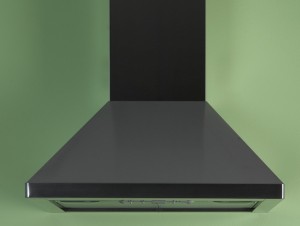
All kitchens need a good extraction fan, whether it be the hood design shown here or one integrated into a unit.
- Use in-store (and online) kitchen planners to transform these specifications into a 3D plan for the best idea of how your new kitchen layout might look.
- Always be imaginative, but be aware of the tried and tested options that always work. For example, a sink and draining board is traditionally positioned under a window to make the most of daylight, and give you a view while washing up!
- Don’t forget the essentials that don’t always jump out as being obvious – an extractor fan for example. A kitchen must be well ventilated. Extractor fans may be integral in a unit, or you could go for a decorative hood option.
Kitchen choice
- Once you’re happy with a layout, your final kitchen choice begins with choosing a style of unit that you like, bearing in mind both the quality of the basic unit as well as the style of the doors and the drawer fronts.
- A worktop should be chosen once the kitchen unit choice has been made. As well as being the practical preparation surface, its colour and make up needs to complement the unit choice.
- Sinks and taps need to be chosen in conjunction with each other for a uniform, smart finish.
- Handles and/or knobs may be specified by the manufacturer with the unit choice. Otherwise, look at the other options available – most designs of handles and knobs can be fitted to your unit choice.
- Choose appliances that you need, making sure that they are compatible. For example, check that a cooker is electric or gas or both. Determine whether they will be integral or stand alone. Integrated appliances streamline the appearance of the space as matching doors appear seamless.
- When the basics are taken care of, consider more specialist unit options. For example, is there room for a wine rack?
- Check if it is possible to choose a plinth, which covers the gap below base units and the floor. Also decide whether you want a cornice (moulding that fits onto the top edge of wall units), or a pelmet (moulding that fits to the bottom edge of wall units). All are neat finishing touches.
- Check the final design of your kitchen choice. Note the different functions of the kitchen to make sure there is enough worktop space, sufficient storage and that the appliances you use most are handy.
Kitchen ordering
- When you finally come to ordering your kitchen, you need to check and double check delivery times.
- As far as possible, ‘pin’ the kitchen supplier down to ‘guaranteed’ dates. If you are ordering goods from more than one supplier, it may add complication to your planning but its an option worth looking into if you can make good financial savings. For example, many people will buy their appliances from a company that is different from their kitchen unit supplier.
- Be as tough with your kitchen suppliers as is reasonable – ‘Part delivery’ is no good. Bits to ‘follow later’ is no good. Between ‘this date and that date’ is no good. And remember that unless you are doing everything yourself (highly unlikely!), you will need to book in tradesmen.
- To emphasise the importance of trying to get everything on site, if one crucial component or unit is missing, this leads to a domino effect in re-arranging and re-booking tradesmen. Therefore always remember the simple equation:-
The basic order of work for fitting a kitchen

Once you get to fitting, make sure you have ALL the kitchen, and the various trades lined up to meet your schedule.
Numbered below is the most basic order of work for fitting a new kitchen. There will be variations depending on your particular circumstances. For example in some cases, you may do a first coat of painting before fitting the kitchen, and in some cases you may want to lay the floor before fitting the kitchen. Also, depending on your own abilities, you need to consider where you need help from tradesmen. Regulations surrounding plumbing and electrical work need to be strictly adhered to. Make sure you comply to local codes and regulations.
- Strip out the old kitchen.
- Carry out electrical and plumbing first fix as required.
- Replaster as required.
- Fit the kitchen.
- Carry out electrical and plumbing second fix.
- Decorate and fit flooring.
A final thought about kitchen planning and fitting
I’ve made no reference here about who to buy from and where to look. This is a subject for a future post, but I would always start a search with the big suppliers such as Wickes, B&Q, Screwfix, Magnet, Homebase and Ikea. Read everything on product specifications from carcass (unit) component thicknesses to how many decibels of noise an extractor fan will make. Read all the small sprint on ‘Sale’ specifications. Find out all the ‘included in price’ details along with the often very expensive ‘not included in price’ extra details…..
There’s a lot of information on the actual kitchen fitting in my kitchen guides which should be detailed in the ‘Related Posts’ section further down this page. Good luck with planning and fitting your kitchen!
