Interior door frames
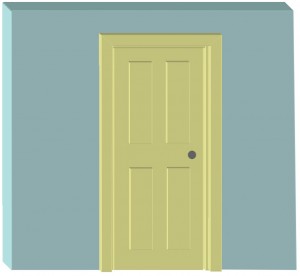
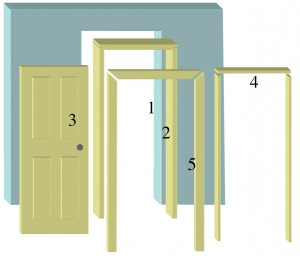
Interior door frames do vary in design and construction, but the most commonly used system in the UK is covered in this post. Before you go about changing an internal door, or fitting a new door in a new frame, it’s best to fully understand how the door frame is constructed. The two illustrations below show the main components of a door frame. Fig. 1 – shows the completed door and frame construction, whilst Fig. 2 – shows how the door and frame have been assembled.
1. Rough opening -Â All doors and frames are fitted into an opening, sometimes called a rough opening. However, don’t be confused by the terminology, as if you are constructing the rough opening yourself, whether it be in studwork or blockwork, you really want to be as accurate as possible!
2. Door Lining -Â Door linings are basically the inner part of a door frame onto which a door is hung. Constructed from 3 sections of timber that are then inserted, and fixed inside the rough opening.
3. Door – The door is hinged on the door lining.
4. Door stop – Once the door is hung, you then position door stop around the inside of the lining so that the door has an edge to close onto (i.e. so it doesn’t swing all the way through the lining.)
5. Architrave – These are the decorative mouldings that are fixed to the edge of the door lining, to cover the junction between the lining and the wall, thus creating a good decorative finish to the frame.
Fitting a new door
When you want to change an internal door, it is not normally necessary to change the lining, as you simply remove the old door, and hang your new door on the existing lining (see my guide – ‘Fitting an internal door’). However, if you have built a new wall from block, or studwork, or if the old lining is damaged and needs replacing, then this is when you will need to know how to measure up for a new door lining to fit your rough opening.
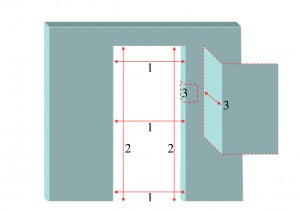
Because rough openings are rarely exactly ‘square’, especially if it is an old house, you must be precise when taking measurements – see Fig.3.
1. Measure width of the rough opening at every level.
2. Measure height of the opening at every point.
Take the smallest width measurement, and smallest height measurement to determine the dimension/size of lining kit you require. Most rough openings are designed to take doors of standard sizes, with 686mm (2ft 3in) 762mm, (2ft 6in) or 838mm (2ft 9in) being the three most common door sizes. So, you simply choose your door lining accordingly – i.e. a 762mm door lining is for 762mm doors.
3. Also, measure the depth requirement illustrated in the cut out and magnified section in Fig.3. You must take into account here, what will be the finished depth (thickness) of your wall, as door lining kits also come in various depth options.
For example, if you are fitting the lining into new blockwork which is typically around 100mm in depth, your lining needs to be 100mm plus the depth of the render/plaster (around 15mm each side), and so you need your door lining at 130mm in depth. Not surprisingly, one of the standard kit depth sizes is 131mm.
Choosing the right door lining kit
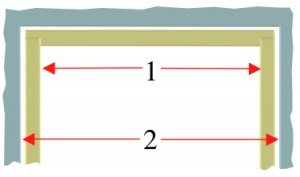
Having taken all your measurements, the crucial point when choosing the correct lining kit is demonstrated in  Fig. 4.
1. Lining kit width denotes the internal size of the lining, and therefore size of door that fits into it.
2. The rough opening needs to be much wider to include the thickness of the timber in the lining kit, plus about 10mm on each side to give you a bit of ‘wriggle’ room when fitting the lining.
Therefore in Figure 4. if measurement 1 is, for example, to fit a 762mm door, measurement 2 would in this case need to be around 840cm. Looking left to right across the frame, the measurements from one side of the rough opening to the other would be:-
10mm (wriggle room) + 28mm (lining) + 762mm (door)+ 28mm (lining)+ 10mm (wriggle room) = 838mm (call it 840mm)
Lining kits and CLS
If you have constructed your wall out of CLS (smooth planed timber), which typically will be 89mm in depth, you will hit a problem unless you cut down one of the easily available standard kits, or go to a timber yard/specialist supplier. Why? Well, 89mm (stud depth) + 25mm (2 x 12.5mm layer of plasterboard on each wall side) + 4mm (2 x 2mm layer of plaster skim on each wall side) = 119mm. Clearly, a 119mm finished wall depth means a 131mm lining will sit far too proud of the wall surface on both sides, effectively meaning that when you attach your architrave to the lining, to finish the frame, there will be a ‘massive’ gap bewteen the architrave and wall. The other standard door lining kit width is 106mm – which is clearly too small.
So, why can’t you get standard kits to fit 89mm CLS off the shelf everywhere? Well, yes, seems crazy, but a few years ago, we all used to construct studwork out of rough sawn timber that was 100mm in width (same width as a concrete block), so 131mm linings were fine. However, in the last few years, CLS timber has become the norm for studwork because it is smooth planed, generally ‘straighter’ and easier to work with, and quite simply……all the suppliers/manufacturers of linings, haven’t quite got their act together in catering for this size requirement! Some timber/builder’s merchants are on the case with this but sadly, at the time of writing, none of the big DIY outlets seem to sell the right sized lining for 89mm CLS (one did tell me, coming soon though!).
All the above, does look more complicated than ‘it’ actually is. Therefore, quite simply, if you need to buy and fit a new door lining to create a door frame for hanging a new door.
- Measure the rough opening.
- Choose a lining kit that will fit in the opening, which is not only the correct width and height, but also the correct depth in relation to the finished depth of your wall.
For more information about assembling and fixing a lining in place, see my guide ‘Fitting a door lining’. Also, slightly further down this page you will see a number of links to related posts containing further information on door fitting, architrave fitting, handle fitting and much, much more.


Maybe the guy who fitted my dining room door should take a look at this, atrocious job!
Good info, confirming what I suspected: timber merchants have not got their act together with regards to cls stud work and width requirements. If you know any that have, please share.
Thanks!
Tom(north East)