Fitting a door lining
Fitting a door lining is a job that is required if you are replacing an old door lining, or you’ve built a new wall with a doorway, and therefore need to create a perfectly ‘square’ wooden frame onto which you then hang your new door. For more information on openings for doors, the anatomy of a doorway and frame, and measuring up for a new door lining, see my guide – ‘Interior door frames’. The sequence below shows how to assemble a door lining kit, and how to fit it into the opening in a wall.
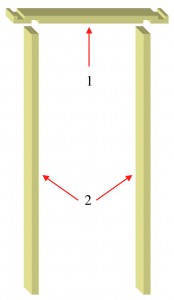
Door lining kits are supplied in three sections (they may also come with three lengths of door stop, but you don’t need those until later on, after the door is hung). The components of the lining are shown in Fig. 1.
1. The head section, which goes at the top.
2. The two side sections, often called legs or jambs.
The head will generally have machined grooves, into which the door lining legs or jambs are fitted. The head is often reversible, as shown in the picture, as one lining kit is then able to fit two different sizes of door. You simply choose which way up you use the head, according to your door size.
It should be a tight fit when you insert each leg into the head. Usually a tap with a wooden mallet, or the butt end of your hammer is all that is required to knock the legs into place.
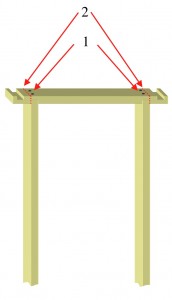
You still need physical fixings to hold the head in place and this is shown in Fig. 2.
1. Use two to three fixings to screw down through the top of the head into the legs (80mm screws are fine for this). Take great care to insert the screws dead straight as the lining legs are not particularly wide. You also need to ensure that the joint between the head and both legs (on both sides) are completely flush. What you don’t want is the head protruding forward slightly, or recessed back slightly, creating a small step in the joint between the head and legs.
2. Once the head and legs are screwed together, saw off the ‘horns’. These are basically the section of the head left sticking out on either side.
(For illustrative purposes, in Figs. 1-3, I have shown the door lining upright. In reality, you want it lying flat on the floor for these steps.)
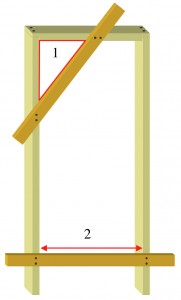
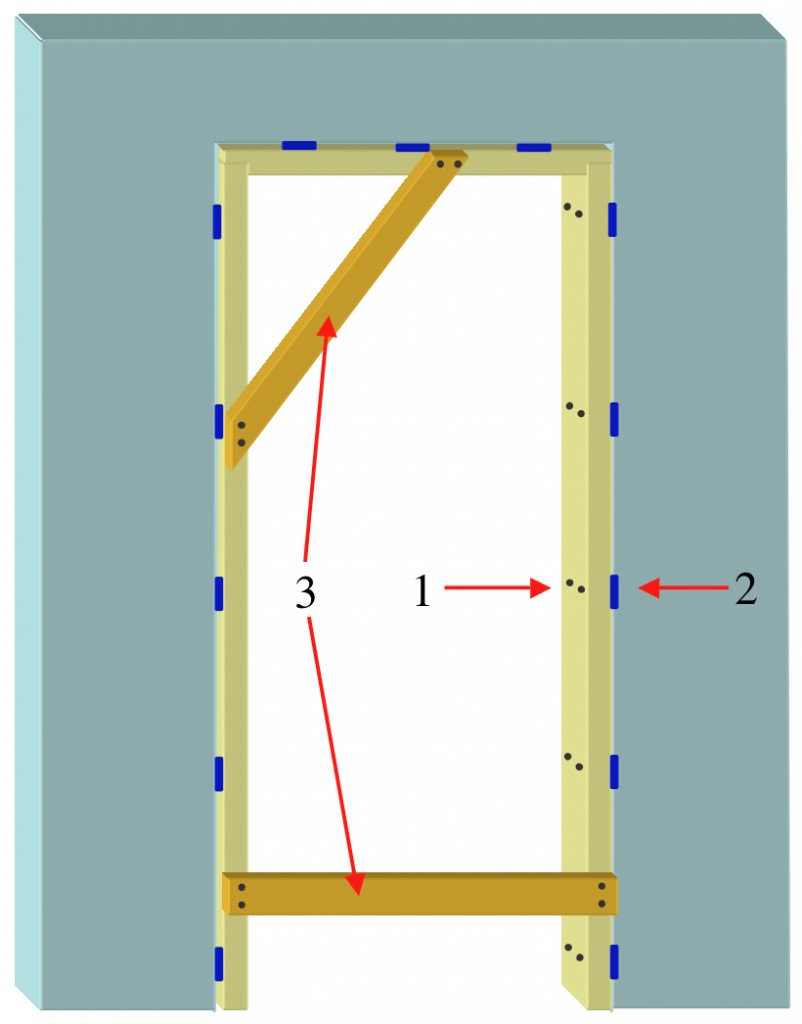
You now need to brace the lining so that it is totally ‘square’. This is done by using two lengths of batten (typically 50mm by 25mm). One is fixed diagonally across the top corner. The other horizontally near the bottom of the legs – See. Fig. 3.
1. We use a simple formula to ensure that a corner is square, based on the fact that if a triangle has sides that are in a ratio of 3:4:5, then a right angle is always formed. Therefore for door linings, typically we scale this up and measure 30cm along the head, and 40cm down one leg and make a precise mark in each position. You then make an exact 50cm measurement on a length of batten (with excess at each ends), and then fix the batten precisely across the corner of the lining, making sure the marks on your batten correspond precisely with the marks on the head and leg.
Once the corner is braced you measure the exact width of the lining at the top (the interior measurement), and mark this measurement on a second length of batten, again, with excess at each ends.
2. You fit the batten 100-150cm up from the bottom of the lining, making sure that the marks on your batten align exactly with the edge of the lining. What is also essential here is that each leg is marked off at the exact same height. The most accurate way to do this is not to measure up from the base of the legs, but rather, back from the head. A typical measurement may therefore be 1800mm from the head down each leg.
Both battens are held in place with temporary screw fixings, and the reason for the excess, is if you initially cut the battens shorter, you would split the end of the battens as you insert the screws. Screws always split wood if you are too near the end of the length. But once the battens are fixed, you then cut them back flush with the edge of the lining.
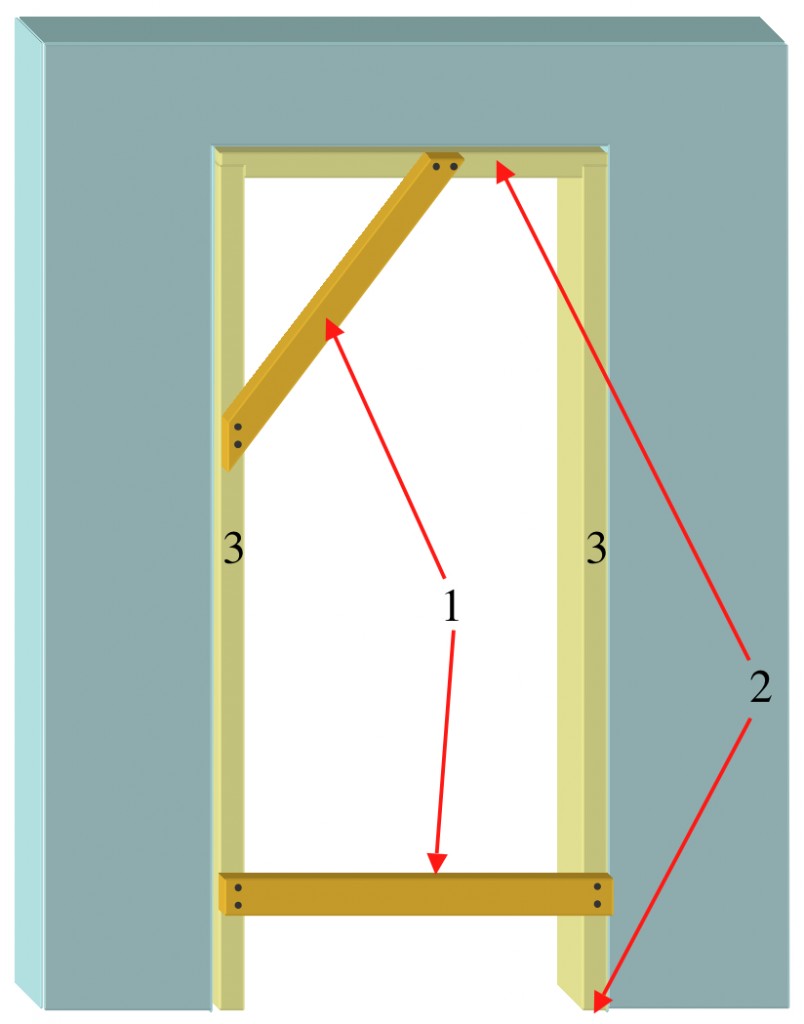
The lining may now be inserted into your wall opening, or rough opening, as it is generally called. This is shown in Fig. 4
1. As mentioned above, the battens have been trimmed back flush, but they now stay in position until the lining is securely fixed in place.
2. Depending on how ‘standard’ the rough opening size is, you may need to cut down the height of the lining. You simply do this by trimming both legs of the lining accordingly. Ideally you should leave 5-10mm ‘wriggle’ room above the head.
You are now in a position to start fixing the lining in place. I tend to use 100mm screw fixings, on their own, if you are fixing into wood (studs), or with wall plugs, if going into masonry. For more information on fixing and fixings, see my ‘DIY Basics’ guides. You will also need wedges that you can either make out of wooden offcuts, or you can buy packs of plastic wedges. Personally, I gave up whittling away and making wooden wedges years ago, as the custom made ones make life so much easier, and because they have so many other useful DIY applications, I always have a pack on hand. My favourite variety aren’t to my knowledge available in the big DIY outlets but you’ll find them in Screwfix, and they are also available on Amazon.
You use the wedges to help get the lining exactly vertical (and the head level), as well as getting it precisely positioned, so that any overlap along the front edges in relation to the wall, on both sides of the wall, are the same. The size of this overlap depends on the finished wall depth and for more information on lining depth in relation to wall depth (thickness), again, refer to my guide – ‘Interior door frames’.
Fig. 5. shows the main considerations for fixing. You need to constantly check and re-check that the lining is vertical/horizontal, and that any fixings do not distort the lining shape.
1. Fixings need to be used in pairs – 5 pairs per leg is ideal.
2 In order not to distort the frame, packing with wedges at the points where the fixings are inserted makes sure that when you insert your screws they don’t pull the frame out of shape.
3. Once the lining is fixed in place, you can remove the battens.
The order in which you insert fixings is not of vital importance. I’ll tend to get one in at the top of each leg, followed by one in near the bottom, again, checking and rechecking with a spirit level and tape measure, literally, after every fixing. After that, you just fill in the rest. The beauty of screws is that if you get things wrong, you simply unscrew and adjust.
One further point worth bearing in mind is that although you want to keep the lining precisely ‘square’ etc., the most important leg is the one which will take the hinges. This is where a long spirit level (1.8m) is very useful as when you hold it against a leg, if you see ‘light’ between the level and the lining, you know it’s not quite ‘square’ so you simply adjust.
As mentioned, my other guide on door frames is well worth reading in conjunction with this guide. Also please see below for other related posts about door fitting, repairs, and maintenance.

thanks for this info, makes my upcoming door lining install seem less scary. makes it look straigtforward.
Hi Paul,
Glad I could help!
Great instructions, I’m curious about the type of screw to use for fixing to blockwork. I’m about to install a door lining and have decided on 8x100mm fischer frame fixings.
Also, the screws for fitting the head to the legs, you mention 80mm but don’t give the diameter – I went for the smallest that could give me an 80mm screw (4.5) – should I pre-drill a hole for the screws?
Thanks!
Hi Lewis,
Glad you found my instructions helpful. Your Fischer frame fixings will be fine, but I normally just use any quality 100mm screw with standard wall plugs.
Again, 4.5’s will be fine for fixing the head – as would 5’s or 6’s, or even 8’s. Pre-drilling will certainly eliminate any risk of splitting, but as long as you fix the screws in place before cutting off the ‘horns’, you generally don’t need to pre-drill.
Hope this helps,
Best,
Julian
Perfect, thanks Julian. The lining install went well but admit I probably should have got longer frame fixing screws (or just used brown plugs) due to the depth of the frame and the gap before the blockwork. 100mm gave me enough but the expansion point of the nylon plugs that came with the frame fixings was right in the point where the blocks have holes (70s house) so I had a couple of spinners – you live and learn.
I reckon Depth of Frame + Gap Before Blockwork + 60mm would have given me the right screw length and next time, I think I’ll stick to brown plugs.
Thanks again for the clear and concise instructions.
Glad it went well Lewis, and I think you’re exactly right in that we all learn something on nearly every job.
It’s also nice to know that my instructions are concise and clear!
Many thanks,
Julian