Best wood floor
Choosing the best wood floor for your home can be a tricky process unless you know precisely what options are available to you. This process is further complicated by manufacturers using all sorts of differing terminology that can hinder, rather than help, the consumer know exactly what they are getting. In this guide I’ll try to simplify the process, explain some of the buzz words, and therefore allow you to make an informed decision on buying the best wood floor for your needs.
Two types of wood floor

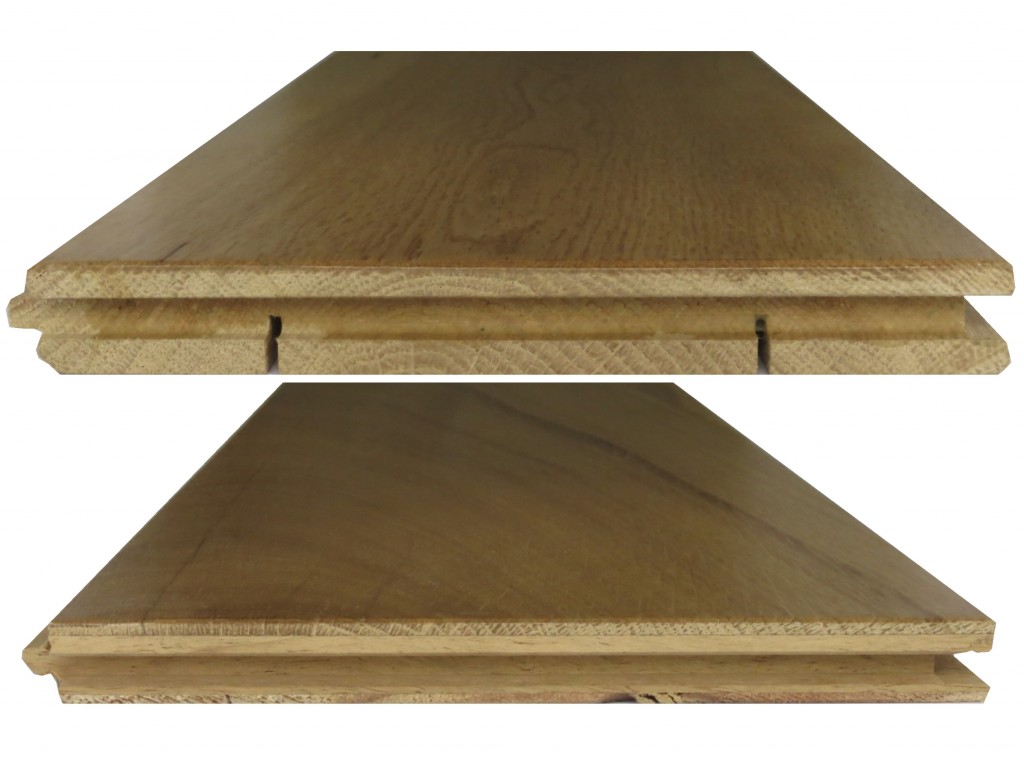
Viewed from end on, the upper plank is solid wood, and therefore is the same wood all the way through. The lower plank is engineered wood, so only the top few millimetres are the ‘finished floor’ wood, with lower layers being constructed from cheaper soft wood.
Firstly, there are just two types of wood floor, so whatever you see written down or advertised can be fitted into one of two categories. Firstly there are solid wood floors, and secondly there are engineered wood floors. That’s it. Nothing else.
Laminate flooring is a totally different animal, so put it right out of your mind as it has nothing in common with a wood floor, other than some of the techniques used for laying a laminate floor may be similar to the techniques used for laying a wood floor.
Solid wood floors
The name says it all really, in that the floor planks or sections, from top to bottom, are made out of the same wood, and generally a hard wood, for example oak. Sometimes you may see a solid wood floor called a real wood floor, but check the specification exactly, as it could be a real wood engineered floor, which will have the characteristics as stated below. The connection mechanism between planks may be tongue and groove, or simply butt joined like traditional floorboards.
Engineered wood floors
Engineered wood floor planks, or sections, have a solid wood top layer (usually a few millimetres), which again is normally a hard wood such as oak, but below that are layers of another, much cheaper wood which is bonded together in a similar manner to ply. In other words, each layer is laid and glued at right angles to the next. This has the effect of producing an incredibly strong structure that is far more resistant to warping, or bowing, than a solid wood plank. All engineered floors will have some sort of tongue and groove connection mechanism.
Number of strips
Engineered floors are available as single planks (like the one shown in the photo above), that effectively produce the look of a floor constructed of floorboards, but they are also available as what are referred to as two strip, or three strip options. Basically each plank is divided into further strips, and so once the whole floor is laid, the effect is that of a floor made up of much thinner sections of timber, much like a traditional wood strip floor.

Over time, joints move slightly, and dirt can gather along all the edges of two strip, or three strip engineered floors. Makes it rather easy to pick out the separate sections of the floor.
This all comes down to personal preference, but if you go for a strip floor effect option, choose it because you like it, rather than because you want it to give the effect of being a genuine solid wood strip floor.
Don’t get me wrong, there’s nothing wrong with engineered strip floor options, but even the untrained eye will always be able to pick out the separate planks making up the floor, and these planks become more defined with age.
Basically, dirt will get in the joints, and however much cleaning you do, you’ll never get rid of this and the effect is to outline each plank. It’s just something I don’t like, but to others it may not be a problem.
Fitting wooden floors
Always, always, always, read the manufacturers guidelines about everything to do with a particular floor you may be considering buying. Why? Because there are so many little intricacies in fitting techniques that can vary from one floor to the next. Below are some general pointers, but again, I stress, read and re-read all the directions supplied by a manufacturer:-
- Most solid floors can be nailed down, either by face fixing (like nails through floorboards), or ‘secret’ nailed, where you nail at an angle through the tongue of boards, so that the groove of the next board effectively covers the previous board’s fixings.
- Most solid floors can be laid on a solid bed of adhesive.
- Some solid floors can be laid ‘floating’, where the only adhesive used is to connect the tongue and groove of adjacent boards, and there is no adhesive, or nails used to physically connect the planks with the sub floor below. A flooring underlay of some nature is required in this case, sometimes a self-adhesive one, which helps secure the planks in position. Some may also use clips on the underside of the planks to secure them in place.
- Engineered floors are nearly always laid floating.
- Some engineered wood floors require no adhesive whatsoever as the tongue and groove mechanism alone holds all the planks in place, whilst others will require adhesive along the tongue and groove sections.
- Some engineered floors can be stuck down on a solid bed of adhesive.
- Both engineered and solid wood floors may be supplied ‘finished’ i.e. the surface has already oil/varnish/wax applied, or ‘unfinished’ i.e. bare wood, so you have to then apply some sort of finish to the wood.
What about the floor underneath?
It goes without saying that the floor below (sub floor) your new wooden floor must be well prepared, but you also need to take into account its suitability for having a new wooden floor laid on it. Again, you need to check the individual recommendations by manufacturers but in general:-
- If you’re laying on top of old, or new, floorboards, they must be secured down properly, and in many cases you will be advised to lay a layer of ply over the floorboards prior to fitting your new floor.
- Concrete floors must be made as level as possible, and in most cases a self-levelling compound will need pouring across the floor surface prior to laying your new wood floor.
- With concrete floors especially you will need to take into consideration as to whether the floor already has a damp proof membrane (dpm) installed, if not, you must lay one prior to fitting your new floor. For a floating floor, you can simply roll one out before using your underlay, or use a combination product where the underlay is incorporated in the dpm. If however, you wanted to lay your floor on a bed of adhesive, first, you would need to lay a liquid dpm.
My preferences

I always opt for single plank engineered flooring, 20mm thickness and over. You don’t get the ‘outlining’ problems as shown by the two and three strip options.
My preferences for wood floors lay firmly in the engineered wood camp. Don’t get me wrong, I love solid wood floors, but engineered floors are just so much simpler to lay – little or no adhesive required, planks tend to have a better fit, and there are basically far fewer things that can go wrong, than with a solid wood floor.
However, there is always that issue of people commenting on the fact that it’s not a solid wood floor, or fitters swearing by the fact that you can always tell an engineered floor because it “bounces”, and doesn’t feel solid underfoot. Well in both cases, I tend to disagree, as quality options neither “bounce”, nor feel hollow under foot, if laid correctly.
I have two floating engineered wood floors in my home, and without exception every visitor thinks I’ve sanded and oiled the original floorboards, and ask “how did you get them to come up so well?”. In fact, that is the only give away, because they look a little too good, and underfoot there is no bounce, and they have a completely ‘solid’ feel. Basically it all comes down to making the right choice of boards, and I always go for at least 20mm depth options which are single plank ie. not the two or three strip options, for the reasons mentioned earlier.
Although you can get wood floors at the major DIY outlets, I always tend to go to the independents, with UK Flooring Direct being one of the best nationwide suppliers around. They have options that cover most budgets, but if at all possible, choose an engineered floor that is 20mm thick or more. Read the reviews, they say it all. They also have a huge range of underlays for every situation, and budget, and they’ll supply samples free of charge which I always think is a sign of a decent company.
Best of luck with your wood floor deliberations!

We have laid a new solid wood floor in our bathroom, and want it to look ‘aged’. We think we need a stain to soak in( to create an ‘older’ wood colour, any colour suggestion? don’t want any orangy tones) and a wax to seal and put a slight sheen on the surface. We don’t want something that sits on top of the wood as we know from experience that this wears off, and looks unsightly. Could you please advise us on the best two products we need to do this? HELP!! please!?
Hi Janet,
I would opt for Osmo Oil in this situation, and specifically Osmo Polyx-Oil that you can buy tinted to different colours. As it’s a bathroom, you’d be best advised to first use their Wood Protector as a basecoat. With Osmo, there’s no problem of it ‘sitting on the surface’ and in my opinion the Osmo system provides the most natural looking of all the wood finishing products on the market.
Creating an aged look on a new timber floor is difficult unless you’ve chosen more ‘rustic’ effect boards. You could experiment with some wood dyes on some offcuts (if you don’t like the Osmo colours). It’s always important to do some tests on offcuts to ensure that you get the ‘look’ you require.
Best,
Julian