Where to start tiling a floor
When deciding where to start tiling a floor, you can employ a number of techniques that will help in your decision-making process. The aim is to produce a tile layout that provides the most balanced effect, in terms of cut tiles around the edge of the room, as well as trying to establish any areas where you ideally need to centralise the design, such as at a door entrance, for example. In reality, your tile layout will normally have compromises as achieving exactly the same sized cuts around the perimeter of a room, could well mean that the tiles are off centre in relation to the main entrance. Every room is different, and therefore there is no precise layout that will fit all occasions, but by applying the principles that I have detailed below, you will be able to work out for your situation, the best place to start tiling your floor.
Making a tile gauge

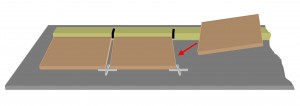
To make a tile gauge, simply lay your tiles out alongside a batten, with spacers, and mark off the positions on the edge of the batten.
Tile gauges are great tools for helping you decide on a good floor tiling layout. A tile gauge is nothing more than a length of wooden batten which you mark off accurately with the exact widths of your tiles, including an allowance for the tile grout in between the tiles. Sometimes it’s worth making two gauges, one for each room dimension if you have a narrow rectangular room, for example, but normally one gauge will suffice.
Simply cut a length of wooden batten (50cm x 25cm is ideal) to a width that is one tile width less than the width of your room. As shown in the diagram, lay your tiles out along the edge of the batten, and use spacers to allow you to mark off the precise tile positions for a row of tiles. You can now position the tile gauge on the floor, allowing you to see where the row will end up, and therefore what size of cut tile you will leave at the end of each row. Because the batten is shorter than the room width, you can shift it each way, and therefore decide on what position will provide the most balanced effect.
Dry laying tiles

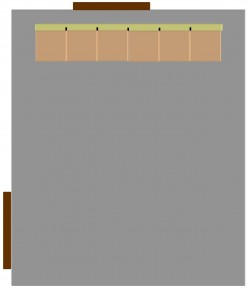
Figure 1. With the aid of your tile gauge, dry lay the first row of tiles to start planning your tile layout.
There isn’t a room in the world that has exactly ‘square’ walls, so you can’t measure off a wall at one end, measure the same distance off the other, draw a line between two marks and know that your tile layout will be ‘square’. Although you can indeed use this system as a starting point, you then need to employ some checking procedures to ‘square’ your design up as accurately as you can.
I always tile from one end of the room to the other, row by row, so my starting point is to position a row of tiles laid ‘dry’, close to the wall I will begin tiling from. If there are two doors into the room I tend to start on the wall which contains the main entrance door. If there’s only one door then starting from the other end of the room is still fine, as you clearly don’t want to tile yourself into a corner! With the aid of your tile gauge, decide on the best row positioning and lay the tiles out with spacers – See Figure 1.
Notice that this initial positioning provides a similar size of cut on the main door wall compared to the adjacent side walls. At this stage you won’t know what happens with the wall opposite to the main door. Also, in this example, there is a tile centralised on the main door, which is ideal, but to achieve this, in many cases you may well have to compromise on the size of the cuts on the side walls. Also, notice there’s a second, side door in the room, so further compromise may be required to try and do some centralising with this door as well.

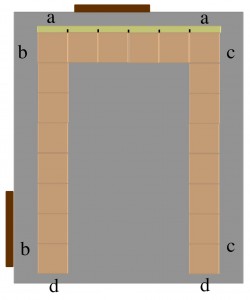
Figure 2. – Lay another two rows of tiles across the other dimension of the room, using spacers to provide an accurate guide.
With one row in position, now dry lay another two rows going in the other direction (again using spacers), which will show where your tile cuts will be across the other room dimension – See Figure 2. With a little shifting around of these lines, and some measuring with your tile gauge, you’ll be able to get an accurate picture of what your best layout option will be.
Ideally, you’ll find that the distances from the last full tile to the wall, on each side of the room will be exactly the same. i.e. distance ‘a’ is exactly the same at both ends of the wall, as is distance b, c, and d. In a perfect world distances a, b, c, and d would be exactly the same, but compromises will always come into play. In this instance you’ll notice that distance d is a fair bit narrower than distance a, but this compromise allows the tile design to be centralised on the side wall door as well as the main entrance door.
Starting to tile

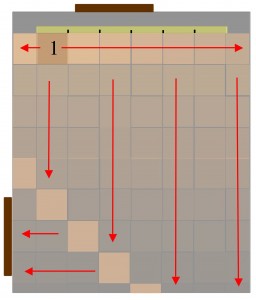
Figure 3. Lay your first tile at position 1, and then build up rows across the room.
Once you’ve shifted your starting batten a tiny bit this way and a tiny bit that way, you are then able to pin down the exact position of your starting row. Secure the batten in place with a few screws, taking care not to screw into any cables, pipes etc, that may be below floor level. The reason you secure the batten, is to ensure that the first row cannot move at all as you butt tiles and spacers up against each other as you move across the room.
Once secure, lay out your tiles dry, once more, just to double check, adjust the batten if necessary, and you’re now ready to position your first tile, and tile your floor.
Figure 3. shows where the first tile would be positioned in this example, and then you simply build up the rows and tile across the floor. Notice how you’ll have to ‘step’ your tile laying once you get down the other end of the room, so you can tile back towards the side door. Only remove your batten when your first row is dry, which effectively means once you’ve tiled across the floor, and left the tiles to dry out over night. Once the batten is removed you can infill with cut tiles along that edge.
Floor tiling tips
- Take your time planning your tile layout. I’ll take anything between an hour for simple rooms, to half a day for more complex layouts, measuring, checking, measuring and checking again, as once that first tile is laid, effectively the layout is decided, and there’s no going back.
- A straightforward grid design is shown here, but the same principles can be applied to other patterns such as brick bond or staggered joint designs.
- As well as measuring and marking, trust your ‘eye’ to a certain extent when trying to judge which are the ‘squarest’ walls to measure off, and what will give the best final product.
- Although this guide predominantly relates to laying hard tiles like ceramic, porcelain or stone ones, the same principles can be applied to soft tiles like vinyl and cork.
- One important check when buying batten is to make sure that it’s straight. Therefore always pick it off the shelf yourself and look down its length to make sure it’s straight, and not warped.
- For more information on fixing floor tiles in place, see my guide – Â ‘Laying hard tile floors’. Also, you’re always going to need a good tile cutter when tiling floors, so I’ve got plenty of advice on the best to buy in my guide – ‘Buying a tile cutter’.

Hi Julian
You have done a fine job of explaining how to tile a floor without making it over complicated.
Great Stuff
John